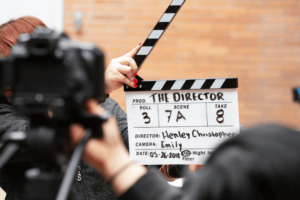
A clapperboard, clapboard, film clapper, film slate, or movie slate is that black and white board you envision when you picture the start of a movie shoot. It’s the traditional way to deal with synchronization. A more modern version of the clapperboard is a digital slate that includes a timecode generator to record the timecode continuously and present it on the slate’s LED display.
Get to Know the Slate
A clapperboard has two parts: the slate and the hinged clapper sticks. You’ll write all identifying information about what you’re recording on the slate. The hinged clapper sticks were added to the slates once film included sound, and they’re used today to streamline the whole process. The second assistant camera, or 2AC (also sometimes known as the loader or clapper) uses the clapperboard to signal to the post-production team when a camera has started or stopped recording. The editor then uses that clap sound to find where each take’s audio and video synchronize. The stripes on the sticks also help set the slate apart from the background so that the 2AC can measure focal distances.
Correctly Marking the Clapperboard
The clapperboard is a universal image associated with film shoots, but it’s much more than just a symbol. That scuffed and tossed-aside tool is an integral part of any movie project. Knowing how to use your clapperboard the right way is an essential role of the 2AC, so you need to get acquainted with the ins and outs of marking if you’re performing this role. To get started, you need to mark the slate right so that it corresponds with the script supervisor’s report. A working slate will have spaces to show the following:
- Roll/reel number
- Scene number
- Take number
Collectively, that information is called the “Head ID,” and some clapperboard layouts will have more information than others.
Roll Number
Roll number refers to the roll of film you are currently shooting on. In the case of digital shooting, it will signify the specific media file. Roll numbers consist of a letter followed by three numerals. For the numerals, your first shot of the day would be “001.” The letter is how you identify which camera was used to record the particular roll. Even if you have only one camera, you should still mark the slate for the “A” camera, just in case additional cameras are brought in later on. You’ll also want to mark the audio roll if you don’t have dailies to help out the assistant editor. Use a letter that comes later in the alphabet, like an X, so that the audio roll doesn’t get confused with another camera.
Scene Number
You’ll mark a scene with a combination of letters and numerals on the clapboard. The letter indicates a shot, while the numeral denotes the scene number. Keep in mind that the camera doesn’t have to physically move to start a new shot. A new shot could be going from a static shot to movement, adding a filter, or changing lenses. You need to mark the clapperboard with a new letter when situations like these occur.
Take Number
A take number is easy to mark because you only need numerals to identify which take you’re on. Sometimes directors choose to do a series in place of individual takes. If that’s the case, you can just write the number for the take along with the word “series” or “SER.” You also might add “P/U” for pickup, which shows the editor that you shot only part of a scene. This happens when an actor mixes up a line and the director does another take starting from that specific line.
Marking the Rest of the Clapperboard
Many areas on a slate are self-explanatory, like the area for date. However, some need a bit more explanation:
- FPS: This section indicated frames per second. You can show the frame rate at which you’re shooting, such as for a slow-motion shot.
- Interior/Exterior or Day/Night: If your slate includes these designations, you can just circle the information that’s appropriate for your shoot.
- MOS: This shows that you’re not recording audio.
- Production: This is the title of a show. You only have to fill this in one time, but make sure you don’t smudge it over the course of shooting.
- Sync: If you mark this, you’re letting the editor know that you’re recording audio and video separately. Use the clapper sticks to synchronize footage as well.
You can use tape on spaces you only need to fill in one time to keep them from getting smudged off. Also, you can avoid confusion by blacking out unused information rather than circling what you are using.
Slate Like a Pro
If you’re working the clapperboard, you’ll need to stand where the camera operator tells you so that the slate is both in frame and in focus. Once the camera and the sound are speeding, you’ll call out the scene and take numbers. Then you’ll shout “Mark!” and clap those sticks together. After that, you should immediately get yourself out of the frame.
The NATO Phonetic Alphabet
Since you’re also using the clapperboard for audio, you need to make which shot you’re on very clear. Many letters sound similar, like D and T. Using a word like alpha or apple for A and Benjamin or bravo for B makes things a lot easier. Especially when you’re starting out, the NATO phonetic alphabet will be extremely helpful. For example:
- Alpha
- Bravo
- Charlie
- Foxtrot
- Romeo
- Yankee
Because some letters look a lot like numerals (such as I, O, and S), they aren’t used on a slate.
Soft Sticks and Second Sticks
You’ll develop some nuance to stick-clapping as you learn. For instance, you need to put a slate in an actor’s face if you’re filming a close-up to get the clapperboard in frame and focus. Then you’ll use “soft sticks” and clap the sticks gently. If you clap too gently, though, the clap won’t get recorded. You’ll then need to do “second sticks” and clap again, a little harder this time.
Tail Slate
You’ll have certain instances when you can’t use the clapperboard at the beginning of the take. In those cases, you’ll end up doing a “tail slate.” You’ll call out those words once you hear “cut!” so that the sound and camera team don’t cut until you can get the clapperboard in. Then, turn the clapperboard upside down to show that it’s a tail slate. Clap your sticks, then flip the clapperboard so that the editor can read the information.
MOS
There are a few ways to do MOS. First, if your clapperboard has a place that says “MOS,” you need to circle it. However, because assistant editors can’t always see this information, you’ll also need to make it clear that the take doesn’t include audio. One method is to hold your hand over the sticks. You can also hold your hand between the clapperboard’s sticks. Either way indicates that the sticks won’t come together.
Multiple Cameras
Efficiency is key when slating for multiple cameras. Go in order, beginning with the A camera. If multiple cameras can view a slate without you needing to move, you can call out “common mark” and then clap the sticks.
Consider the Workflow
Here are some final tips for using a clapperboard:
- Remember that your clapperboard is a communication tool. The information included will help the teams in the next stage of production get their jobs done.
- Keep everything legible and accurate.
- Check with the script supervisor if you’re confused or have any questions about what you should write.
- Speak clearly and clap the sticks at an appropriate volume for a given shot.
- If you need to leave the set for whatever reason, leave the clapperboard with the camera so that someone else can use it if needed.
- If you use a digital slate, it may not contain a clapper, so make sure to show it to the camera before the action starts.
Resources for Buying Clapperboards
Here are a few resources if you need to buy clapperboards:
- Clapperboards from Amazon
- Wooden Director’s Film Movie Slateboard from Amazon
- Professional clapperboards for film and digital productions from Hollywood Clapperboards
You can learn more about filmmaking and how you can improve your skills by applying to the Nashville Film Institute today.


